This is an old revision of the document!
Table of Contents
Foreman/QuickStack Guide:
This page aims to provide a step by step guide to replicate experiment #1 shown in this page.
The guide will cover setting up an OPNFV target environment capable of executing Tempest.
Overview
OPNFV testing environment is achieved by using a handful of open source tools. They are listed in order below in hierarchical order:
- Khaleesi - An Ansible framework responsible kicking off builds and tests
- Foreman - A baremetal/virtual host management tool
- OPNFV/Genesis - Puppet modules for invoking QuickStack
- QuickStack - Puppet modules for installing/configuring OpenStack + OpenDaylight
- OpenStack Puppet Modules (OPM) - Used to install OpenStack
- OpenDaylight Puppet Module - Used to install OpenDaylight
The tools above work together to create the OPNFV target system, but they are not dependent on each other. For example, instead of using Foreman you could just use another baremetal provisioner or simply use raw puppet to install OPNFV. Khaleesi contains a playbook/library to interact with Foreman, but is also used to provision other OpenStack clouds (rackspace, etc.) and is capable of using other OpenStack installers.
The order of operations for how these tools interact from start to end are as follows:
Khaleesi → invokes playbook to rebuild Foreman nodes →
Foreman → installs CentOS and Puppet agent to nodes →
Puppet Agent on each node → checks in and applies OPNFV/Genesis →
OPNFV/Genesis → installs/configures OpenStack and ODL using QuickStack, OPM, and ODL modules.
Khaleesi → invokes playbook to install and configure the Tempest Foreman node →
Khaleesi → runs Tempest and provides results
QuickStack/Foreman Video Recordings
Assumptions/Prerequisites
- One provisioning server and 2-3 node servers.
- All servers will run CentOS 7.
- Provisioning Host installed with CentOS7
- Management network should not have a DHCP server if using Foreman. Foreman will run its own DHCP server.
- If behind a firewall in your network you will need to use a proxy. This guide has instructions on how to setup the tools to use your network's proxy server.
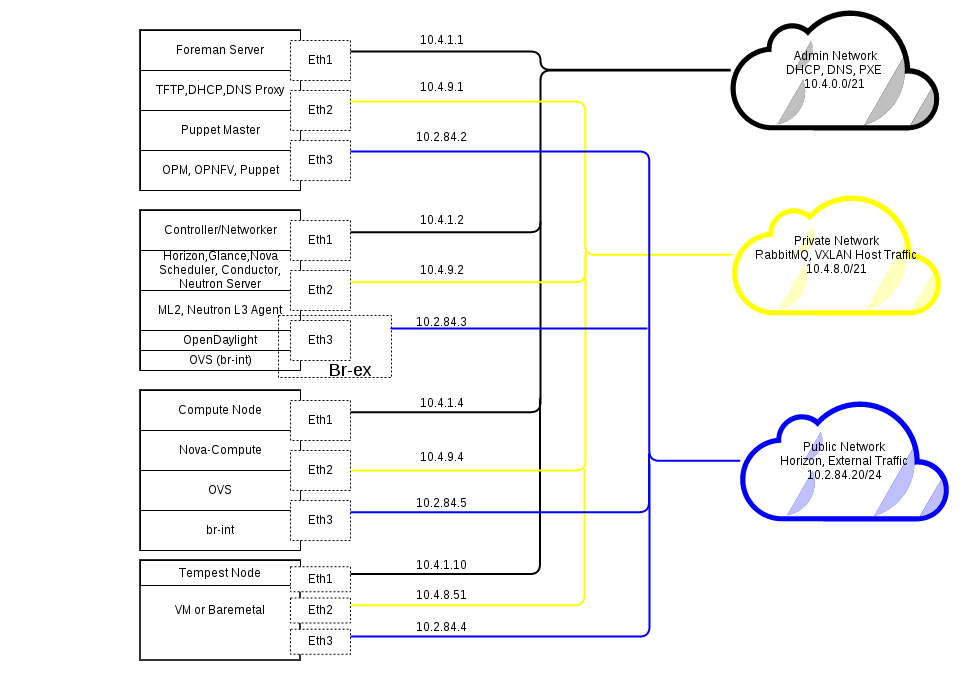
Topology
Below is the topology being used in Intel POD 1:
Process
It is now recommended you follow the "Automatic Deployment" section below for installation. To replicate an full manual install you should follow all of the steps below. The steps are broken down by instructions per tool, in case you are only interested in using part of the OPNFV install:
ISO Installation
Download the Foreman ISO
The ISO is too large to fit on a DVD, use isohybrid and dd to write it to a usb stick:
laptop$ isohybrid arno.2015.1.0.foreman.iso
laptop$ sudo dd if=arno.2015.1.0.foreman.iso of=/dev/sdX bs=4M
laptop$ sync
* important to replace /dev/sdX with the device of your USB stick *
Next boot off of the ISO and run the CentOS installation. The deploy.sh file referenced in the next section Automatic Deployment is installed with the ISO. Continue the OPNFV installation with the Automatic Deployment instructions.
Automatic Deployment
Foreman/QuickStack can now be automatically deployed!
A simple bash script (deploy.sh) will provision out a Foreman/QuickStack VM Server and 4-5 other baremetal nodes in an OpenStack HA + OpenDaylight environment.
Pre-Requisites
- At least 5 baremetal servers, with 3 interfaces minimum, all connected to separate VLANs
- DHCP should not be running in any VLAN. Foreman will act as a DHCP server.
- On the baremetal server that will be your JumpHost, you need to have the 3 interfaces configured with IP addresses
- On baremetal JumpHost you will need an RPM based linux (CentOS 7 will do) with the kernel up to date (yum update kernel) + at least 2GB of RAM
- Nodes will need to be set to PXE boot first in priority, and off the first NIC, connected to the same VLAN as NIC 1 of your JumpHost
- Nodes need to have BMC/OOB management via IPMI setup
How It Works
deploy.sh:
- Detects your network configuration (3 or 4 usable interfaces)
- Modifies a "ksgen.yml" settings file and Vagrantfile with necessary network info
- Installs Vagrant and dependencies
- Downloads Centos7 Vagrant basebox, and issues a "vagrant up" to start the VM
- The Vagrantfile points to bootstrap.sh as the provisioner to takeover rest of the install
bootstrap.sh:
- Is initiated inside of the VM once it is up
- Installs Khaleesi, Ansible, and Python dependencies
- Makes a call to Khaleesi to start a playbook: opnfv.yml + "ksgen.yml" settings file
Khaleesi (Ansible):
- Runs through the playbook to install Foreman/QuickStack inside of the VM
- Configures services needed for a JumpHost: DHCP, TFTP, DNS
- Uses info from "ksgen.yml" file to add your baremetal nodes into Foreman and set them to Build mode
- Issues an API call to Foreman to rebuild all nodes
- Ansible then waits to make sure nodes come back via ssh checks
- Ansible then waits for puppet to run on each node and complete
Execution Instructions
On your JumpHost, clone 'git clone https://github.com/trozet/bgs_vagrant.git' to as root to /root/
Edit opnvf_ksgen_settings.yml → "nodes" section:
      For each node, compute, controller1..3:
                * mac_address - change to mac_address of that node's Admin NIC (1st NIC)
                * bmc_ip - change to IP of BMC (out-of-band) IP
                * bmc_mac - same as above, but MAC address
                * bmc_user - IPMI username
                * bmc_pass - IPMI password
      For each controller node:
                * private_mac - change to mac_address of node's Private NIC (2nd NIC)
Execute deploy.sh via: ./deploy.sh -base_config /root/bgs_vagrant/opnfv_ksgen_settings.yml